
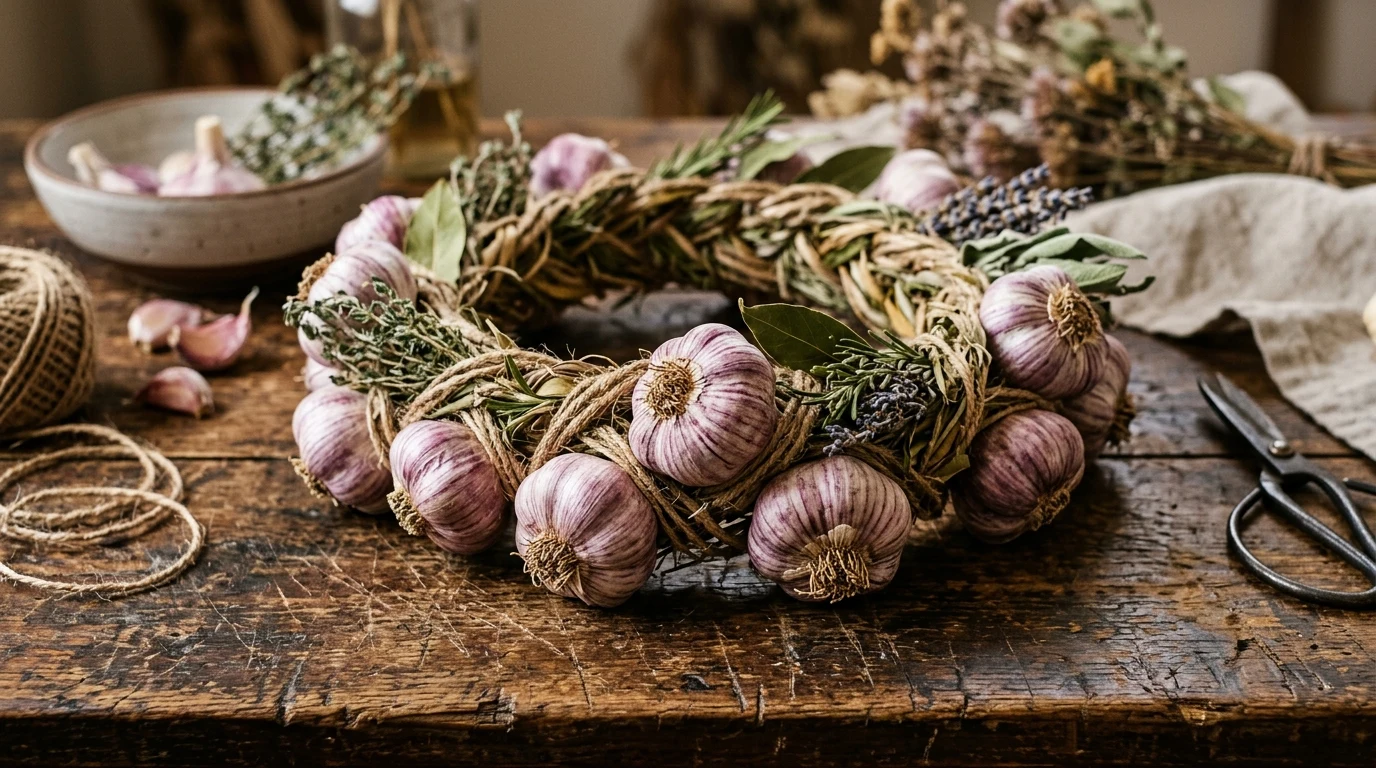
The Garlic Hat: History, Uses, and How to Make Traditional Headwear
✨ This article was AI edited. Editorial responsibility: GarlicFruit.com.
The traditional garlic hat—also known across historical agricultural regions as a garlic crown, braiding coronet, or harvest wreath—represents a brilliant fusion of folk art, agricultural ingenuity, and botanical curing science. Blending artisan craft with post-harvest preservation, weaving garlic into decorative crowns reflects centuries of agrarian heritage from the sunny hills of Provence and Lautrec to the fertile valleys of Gilroy, California.
Contents
- Historical Origins and Folklore of the Garlic Hat
- The Functional Science: Why Braiding Enhances Garlic Preservation
- Softneck vs. Hardneck: Selecting the Ideal Cultivar
- Step-by-Step DIY Guide: Crafting a Traditional Garlic Hat or Wreath
- Best Practices for Kitchen Display and Storage Longevity
- Mastering Curing Tension and Preventing Bulb Loosening
- Frequently Asked Questions
Historical Origins and Folklore of the Garlic Hat
For generations across Mediterranean and Eastern European farming communities, garlic harvesters marked the completion of the midsummer harvest by weaving newly lifted softneck garlic stalks into protective hats and headpieces. In European folklore, garlic was revered not solely as vital culinary nutrition but as a potent apotropaic charm—a natural shield against airborne illnesses, summer biting pests, and superstitious malevolent forces.
During celebrated annual festivals such as the Fête de l’Ail Rose in Lautrec, France, and the Gilroy Garlic Festival in California, master braiders compete in crafting intricate garlic crowns and wearable headpieces to showcase agricultural craftsmanship and celebrate heirloom allium varieties.
The Functional Science: Why Braiding Enhances Garlic Preservation
Far beyond festive ornament, the structure of a braided garlic crown or hat provides significant botanical advantages during the critical post-harvest curing process:
| Storage / Curing Method | Airflow Efficiency | Storage Longevity | Space Economy | Sprouting Risk |
|---|---|---|---|---|
| Braided Garlic Hat / Wreath | 360-degree vertical air circulation | 6 to 9 months (optimal dormancy) | Zero shelf footprint (hangable) | Very Low (dry airflow prevents dampness) |
| Flat Wire Drying Racks | Horizontal airflow only | 4 to 6 months | Requires large horizontal surface | Moderate (undersides retain moisture) |
| Mesh Bag Bulk Storage | Moderate (interior bulbs restricted) | 3 to 5 months | Compact but prone to bulb bruising | High (contact points can trap humidity) |
| Solid Wooden Crates | Poor (minimal lower ventilation) | 2 to 4 months | Stackable but poor airflow | Very High (fungal rot and decay hazard) |
Softneck vs. Hardneck: Selecting the Ideal Cultivar
Selecting the proper botanical variety is crucial before beginning any braiding or crown crafting project:
- Softneck Garlic (Allium sativum var. sativum): Possesses flexible, pliable pseudostems that do not form a rigid seed stalk. Sub-varieties like Artichoke and Silverskin remain supple when dried, making them the absolute gold standard for braiding crowns, wreaths, and traditional garlic hats.
- Hardneck Garlic (Allium sativum var. ophioscorodon): Produces a rigid, central woody scape that snaps easily under bending pressure. Hardneck varieties (such as Rocambole, Porcelain, and Purple Stripe) cannot be plaited directly by stem; they must be bound onto a structural wire or grapevine wreath form using natural jute twine or florists’ wire.
Step-by-Step DIY Guide: Crafting a Traditional Garlic Hat or Wreath
Follow this master craftsman guide to assemble a durable, aromatic, and culinary-grade garlic crown:
Required Materials
- 14 to 20 medium-to-large freshly harvested softneck garlic bulbs (cured for 5 to 7 days until outer wrappers are dry but stems remain flexible)
- Natural unbleached jute twine or raffia cord
- Sharp floral shears or garden bypass pruners
- Decorative botanical accents: dried lavender sprigs, fresh rosemary, bay leaves, dried chili peppers, or thyme
Step 1: Cleaning and Stem Conditioning
Carefully brush away dry garden soil from roots and outer papery wrappers using a soft bristle brush. Avoid washing with water to eliminate moisture-induced rot. Trim root tendrils cleanly to 1/2 inch (1.2 cm) for a neat appearance.
Step 2: Constructing the Anchor Foundation
Select three uniform bulbs with long, straight stems. Lay two stems parallel and cross the third stem over the center. Secure the intersection tightly with a double knot of jute twine, leaving an 8-inch tail for hanging or circular joining.
Step 3: Three-Strand French Braiding
Begin a standard three-strand braid. With each crossover motion, place a new garlic bulb into the center channel, laying its stem alongside the active strand. Intersperse decorative sprigs of dried herbs into the plait as you proceed. Maintain steady tension to ensure a firm, balanced structure.
Step 4: Forming the Circular Crown
Continue braiding until the wreath reaches a circumference of 22 to 24 inches (55–60 cm). Bring the tail stems together with the foundational knot, overlap the ends securely, and wrap with heavy raffia or twine. Trim excess foliage cleanly to finish.
Best Practices for Kitchen Display and Storage Longevity
- Optimal Humidity: Suspend your garlic wreath in an airy environment with 50% to 60% relative humidity. Avoid humid kitchen zones near stovetops or dishwashers.
- Temperature Stability: Maintain room temperatures between 55°F and 65°F (13°C–18°C). Avoid heating vents and direct sunlight exposure.
- Culinary Harvesting: When cooking, snip individual outer bulbs from the top downward using kitchen shears, leaving the inner braided spine intact to support remaining bulbs.
Mastering Curing Tension and Preventing Bulb Loosening
One of the most common challenges when crafting a garlic hat or braided coronet is bulb shrinkage during the curing cycle. As fresh garlic bulbs cure over several weeks, the individual cloves and stems lose approximately 15% to 20% of their cellular moisture content. If the foundational plaiting was executed too loosely, bulbs can shift or slip out of alignment.
- Pre-Curing Conditioning: Allow harvested garlic to cure in a shaded, ventilated space for 5 to 7 days before braiding. This wilts the green stems slightly, making them remarkably supple while preventing post-crafting looseness.
- Double-Anchor Twine Reinforcement: Integrate a strand of 2-ply natural jute twine alongside the center stem throughout the entire braid. The twine acts as an internal structural spine that maintains uniform tension even after stems fully dehydrate.
- Final Tightening Knot: Check the tension at the crown’s circular closure after 14 days of curing, re-tying the raffia binding if slight stem shrinkage occurs.
Frequently Asked Questions
How long does a garlic hat or braided wreath stay fresh?
When made from high-quality softneck varieties and kept in a dry, shaded room with good ventilation, a braided garlic wreath remains fresh and culinary-grade for 6 to 9 months without sprouting.
Can you make a garlic hat using hardneck garlic?
Yes, but because hardneck stems are stiff and woody, they cannot be braided directly. Instead, bind the stems to a grapevine or wire wreath frame using florists’ wire or natural jute twine.
Does wearing a garlic hat repel insects in the garden?
Garlic’s volatile allicin and diallyl sulfide compounds naturally deter certain garden pests like aphids and mosquitoes, though the aroma is significantly stronger when cloves are crushed rather than intact.
Can I add dried chilies or herbs to my garlic braid?
Yes. Weaving dried red chili peppers (such as cayenne or de árbol), bay laurel leaves, and dried rosemary into the braid not only enhances visual aesthetics but also adds natural herbal pest deterrence to your kitchen display.
Get our latest guides, news, and insights highlighted in your Google Search & AI Overviews.


